


|
Flemish Technique
Flemish Technique means different things to different artists and art teachers. I've been asked several times to talk about this classic oil painting technique. When I first started Oil Painting I bought reference books that purported to explain this method and to be honest it nearly destroyed my interest in oils altogether. I persevered because I thought this was the only way to use this rich, amazing paint. For the best part of two years I used the technique and got good results but the rigidity of the formula began to make the process boring. That's simply my taste though so don't be put off what can be an extremely effective path to success. I can only describe how I worked based on what I read and was shown by other artists. I have completed this demonstration and have another one in the pipeline. Don't get me wrong, the technique is a sound one and on occasions I go back to it. When working photo-realistically this method can lead to excellent results but modern made oil paints are stable and have helped artists develop new ways of working, not least impressionistically. I would say learn one or two ways of doing it and learn them thoroughly through the creation of many paintings before delving further. If you are like me you will take certain things way from this technique and combine them with other methods. Glazing is at the heart of the skill and it also introduced me to scumbling. Glazing has helped lift my small talents to enable me to produce satisfying and saleable work and there is no reason why it cannot work for you. Materials: Canvas (use canvas paper or an artboard if you wish) primed with Winsor & Newton Galeria White gesso primer. I primed it myself using three layers but you can buy ready primed canvas, canvas paper and canvas boards if you wish. 6B and HB pencils. A craft light box, not strictly necessary but it saves me time. Tracing paper. Vine charcoal for drawing on the canvas. This can be a little awkward to use with tracing paper so use pencil if you prefer. This isn't ideal but it won't cause you major problems if you use a hard pencil. Graphite and oil paint aren't ideal bedfellows but there's no-one worse than me for this bad habit. Just don't use a soft pencil. Paints are English red, ivory black, titanium white, yellow ochre and I'm also using burnt umber to help with the skin tones. The umber along with the red, black and ochre gave me enough range to produce good skin tones. Ordinarily I avoid ochre and haven't used English red for many years because of my particular style of painting muted colours, however, the Flemish Technique is probably the best way to produce figurative and portrait paintings if your goal is to try and truly capture a realistic image. Follow this link if you need to buy any oil painting supplies
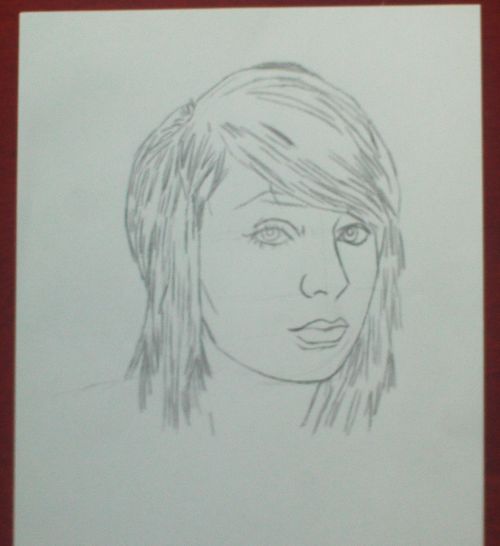
This work is mainly achieved through scumbling and glazing The links above will take you to pages where I briefly discuss the techniques. Patience is required here. You will be leaving your painting to touch dry between each stage except where indicated. This may take three days or more each time. This is where the flemish technique can put people off. Still, if you are interested in oils then the chances are you have patience to begin with. I concentrated on the face of the subject. The painting hasn't been completed deliberately so you can see the effect each layer has on the finished piece. If you follow the layers they add up to a more polished and realistic effect. The final layer will appear to glow under light. Flemish Technique Stage 1 - Tonal Drawing1, My painting will be based on tone rather than colour. The flemish technique is almost an ABC of applying colour so I don't feel the need for any colour studies or reference. I'd like you to try this too. I sketch my subject as accurately as possible.
2, Secondly I place the sketch on my light box and then carefully add tone on a seperate sheet of cartridge paper. I don't need any line work obviously.
3, I continue with adding tone.
4, Using my fingers to blend the pencil and a putty eraser to remove highlights I end up with a tonal version of my subject. If you don't feel confident enough in your drawing skills yet you could try working from a black and white photograph or feel free to copy my drawing.
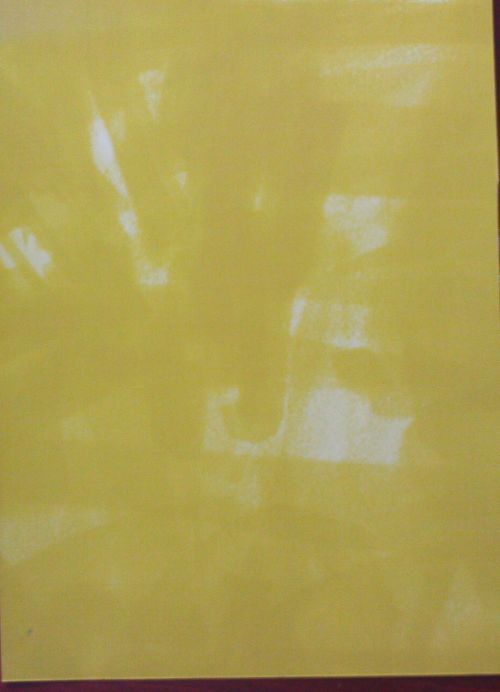
Flemish Technique 2 - Canvas Prep.1, Cover the canvas with a mixture of yellow ochre and ivory black thinned with artists grade turpentine. You can add three layers but no more. You are aiming for three parts ochre to one part black. Thin this with a half of turps. Allow to touch dry.
Flemish Technique 3 - Drawing Transfer and Fixing2, Transfer your drawing with tracing paper and go over the lines if necessary using vine charcoal.
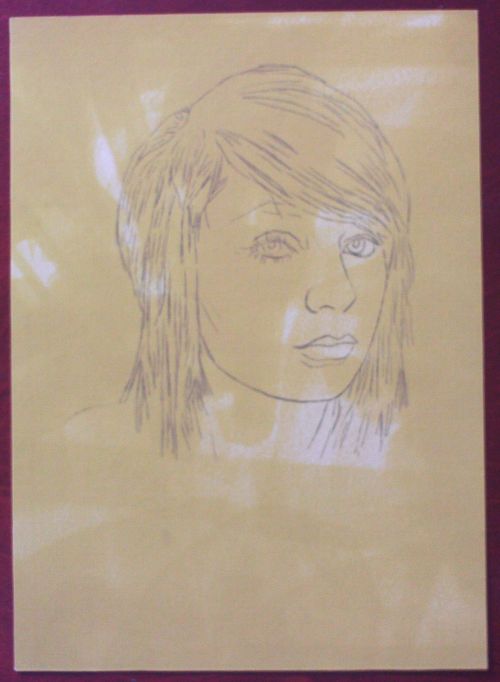
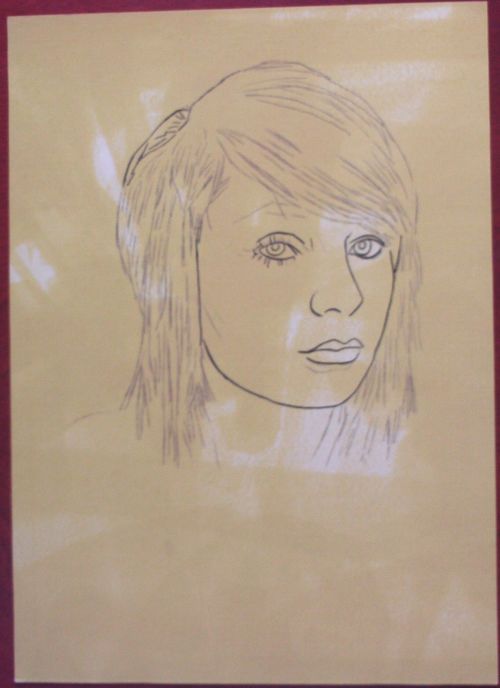
3, It's important to fix the drawing so it isn't obliterated until you are ready to do so. Here I have used ivory black with turps and a size 0 sable brush to go over the charcoal lines. I am told that ink can be substituted here but I have never done this so can't vouch for the results. I've only gone over the lines that I consider important. They are important to me because if I lose them I will find it much harder to get the likeness of my subject.
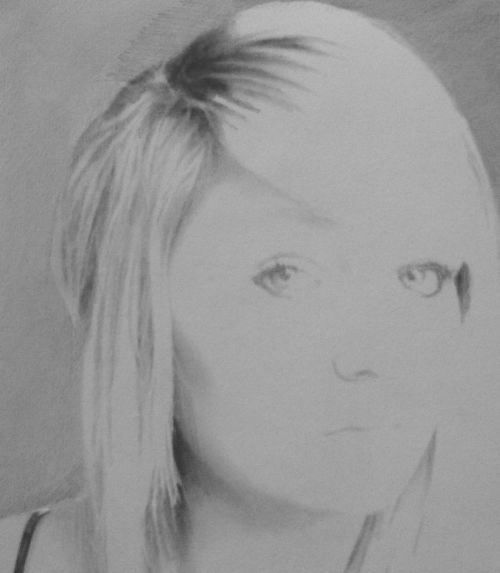
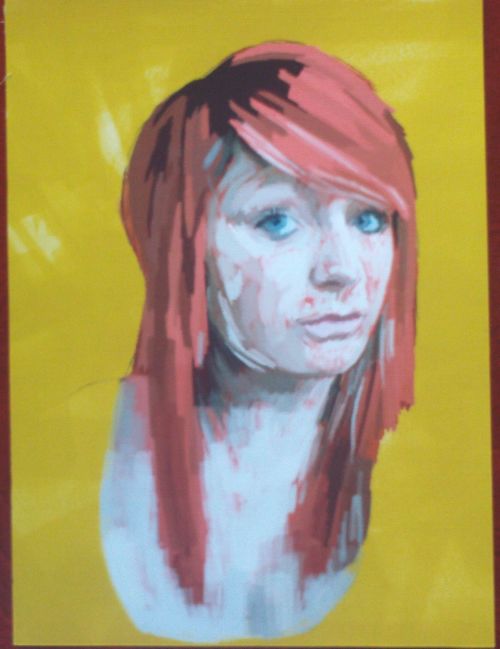
Flemish Technique 4 - Glazing4, Allow the black to touch dry over three days or more if necessary and then the canvas will be ready for glazing. I intend to use three glazes, four at the most. This is where I use a mixture of English red and ivory black. My tonal study in pencil provides me with a guide that I will try to reproduce in red and black. I am still using turps as my thinner. Start with half turps and aim to be using about a quarter in the last glazing session. I glaze my reds across the hair and chest area of the subject. This is accomplished fairly quickly although there is no need for you to rush this stage. The important thing is confidence in the strokes and aiming for the tones already worked out in pencil. Allow to touch dry.
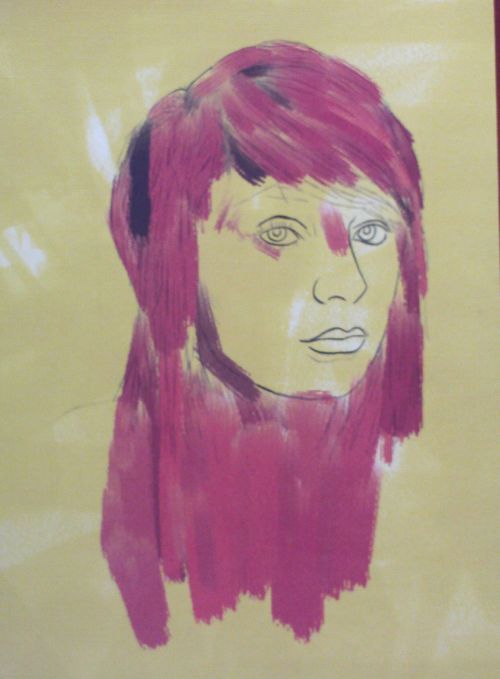
5, I add reds to the face, leaving the eyes alone for now. Again leave to dry.
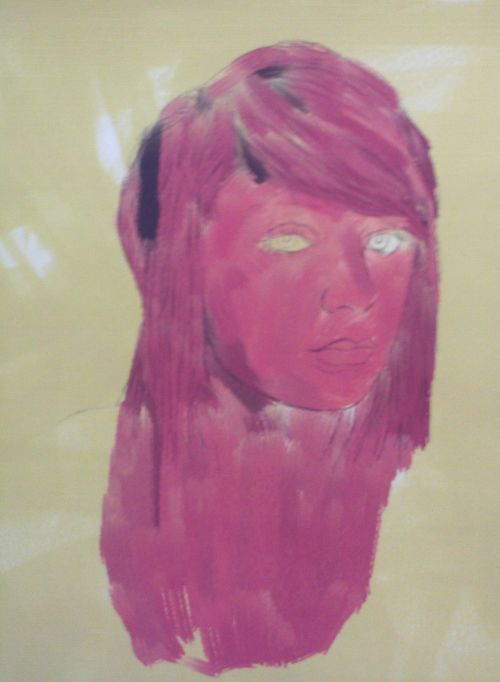
6, I add darks and lights to the eye area. I could have done this at the last stage but wanted complete control and so needed to allow the last glaze to dry to avoid any wet on wet effects.
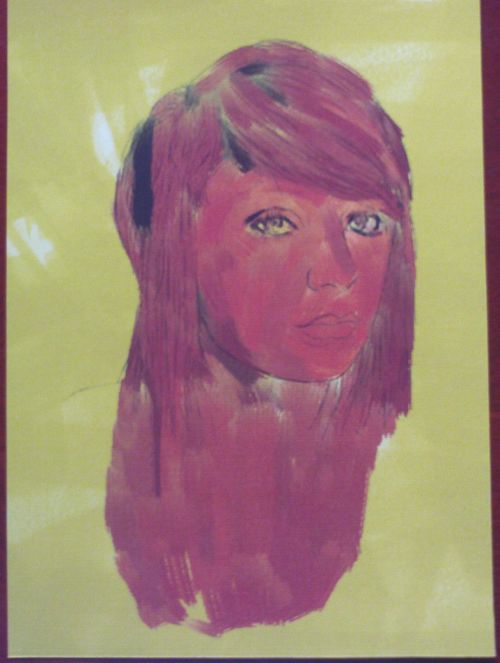
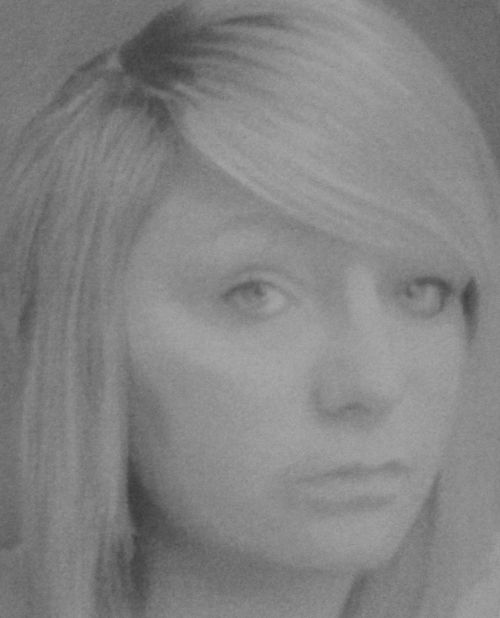
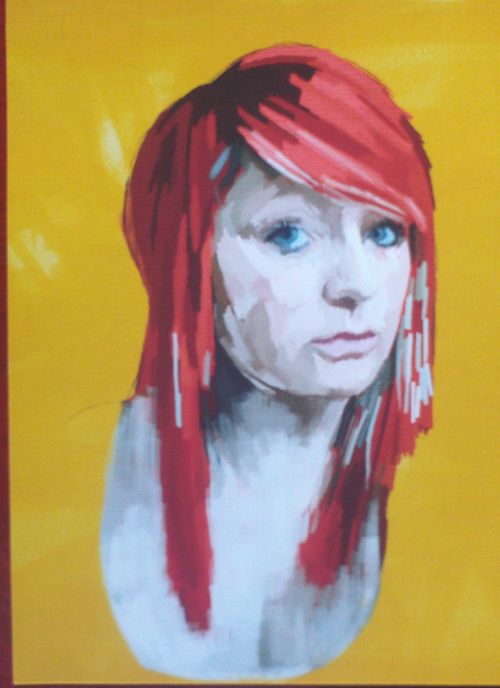
Flemish Technique 5 - Tonal Painting7, Now I switch to refined linseed oil and build up broad areas of dark, light and finally mid tones in reds. The face is beginning to resemble my original drawing. Use about a quarter linseed to paint mix here and work wet in wet.
Flemish Technique 6 - Scumbling8, Once dry I scumble some titanium white where I expect the highlights to fall. To scumble is to use a dry, light, patchy colour over a dark opaque layer. This is an effective and easy technique. I made up several pinks from the English red, titanium white and burnt umber for the darker patches. I used a flat brush SIZE ONE INCH and round SIZE 6. Just drag the colours over the reds using your tonal guide. It stands to reason that the darker umber goes where the shadows are and the lightest colours should be applied where the light falls. You should be able to judge this from your tonal drawing. A lot of people will not attempt this without a colour study or reference but I urge you to try. You will learn an unbelievable amount about painting if you persevere with this.
9, I continue the scumbling and start laying some colours on the hair. The hair isn't scumbled. Switch to paint thinned by about a quarter linseed. Make your strokes count. Slow, steady and with plenty of pressure. I used a half inch flat and rounds 6 and 2.
10, Continue with the face following your tonal guide. Darks, lights and mid tones. As many mid tones as you wish.
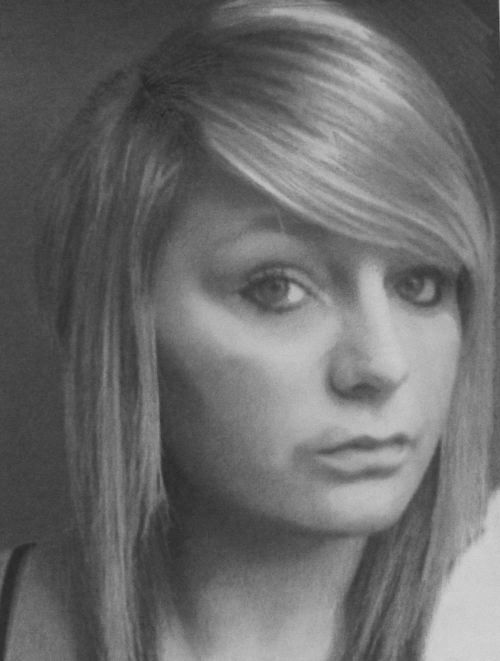
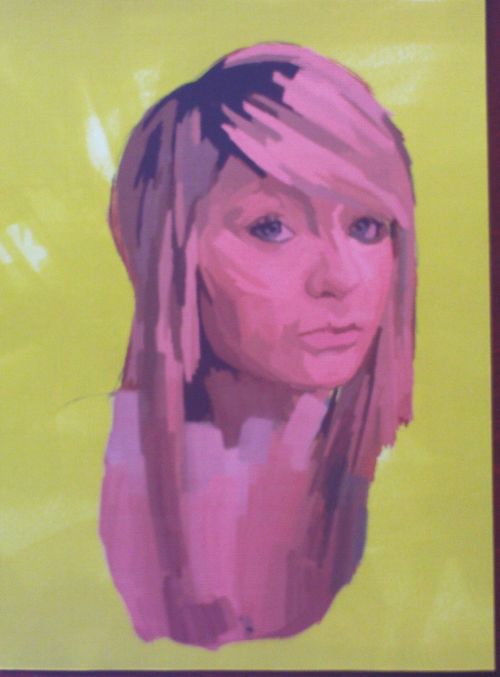
Flemish Technique 7 - Body Colour11, Add colour to the hair. Start with darkest then the lightest and a mid tone. After that add further tones so you have a range.
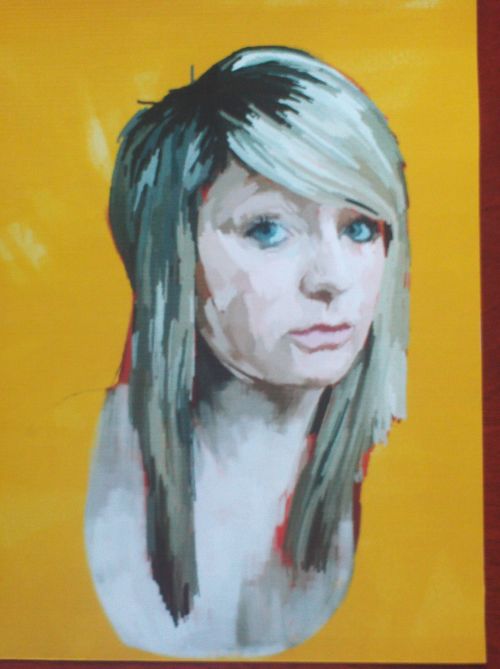
12, Your last strokes will be pure paint. You can either paint over your mid tones and lights or just your lights, whatever you prefer. I painted over both.
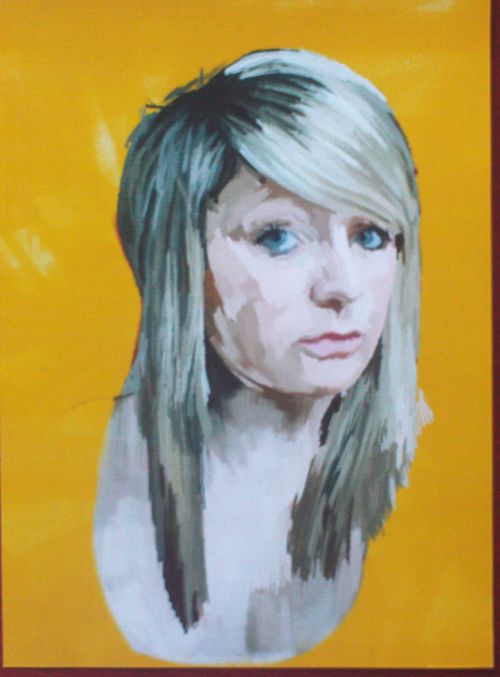
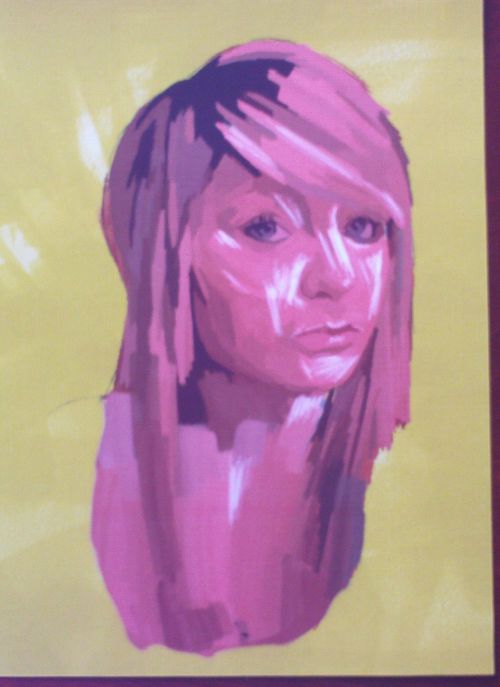
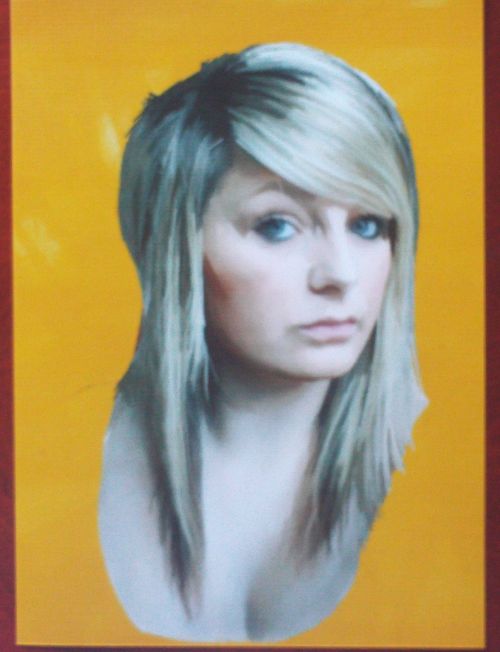
Flemish Technique 8 Blending and highlights.13, The best bit now. Where the face takes on a realistic look. The paint should be a little stiff but still malleable. 2 or 3 days should be enough but there are so many variables you will have to use your own judgement. This was achieved by gently blending in the direction of each brushstroke. I used a fan brush for the larger areas on the face and chest and a half inch flat and round 6 for the hair. Finally using a round 2 I blended the face and facial features. At this stage check if you need to strengthen highlights. If not you are finished.
See this tutorial on basic
blending
Your painting benefits from the yellow and red layers. Red on yellow produces a glowing effect and this is transferred through the imperfect scumbled layers. Look out for my further tutorial on flemish techniques where I use glazes to produce a similar effect. This is closer to what the original practitioners of this technique did. Finally I'd like to caution you about the large number of courses online all claiming to know this magical technique inside out. Bear in mind that most of these artists are trying to sell you something. In my experience there are very few courses worth their salt online. Buying a good book and practicing is far more effective than spending a hundred dollars or pounds on some guru's course. Many of these people seem to wrap themselves and their craft in mystique that the rest of us poor mortals can only glimpse at. This is elitist nonsense. There is a reason I'm saying this. I have been asked to point users to good sources of knowledge and have been quite annoyed to hear that some of you have parted with good money for utter nonsense. I decided to buy some of these DVD's and have subscribed to a handful of online courses to see exactly what is going on. So far I've learned nothing of any worth, however when I've finished I will let you know if any of these resources are worthwhile. Of course I'm not telling you what to do but please be cautious. Money is hard to come by and easy to lose. Buy courses or DVD/CD's where there is a money back guarantee.
Return to Oil Painting Lessons from Flemish Technique Home
|

Browse other gifts from Zazzle.