


|
Oil Painting Technique #8 - Impasto
This is a very energetic Oil Painting method that I recommend because it connects the painter in a real way to all the materials - canvas, paint and brush. Follow this free tutorial carefully noting the written instructions as well as the illustrations. There is something satisfying about applying thick paint in a manner that seems imprecise but is in fact controlled and deliberate. Impasto is obviously an opaque Oil Painting method. It works for landscapes particularly well but is also excellent for portraiture. Paint can be applied with palette knives but I get the best results with brushes. It is possible to complete a painting in a single session but if you decide to add a glaze you must wait until the impasto dries thoroughly or the paint will crack. Please note this important painting tip. Some paints contain more oil than others. Your supplier will be able to advise on that or check the manufacturers'website. The oil content is important because successful Impasto requires paint that is slightly stiffer than fresh from the tube. The best way to prepare the paint is to squeeze it onto blotting paper or any other absorbent material that will not contaminate the paint ( E.g. paper towels or kitchen roll, yuk! What a mess!). Leave for a few minutes and it will soak up some of the oil. Please try impasto with and without blotting and you will know what I mean as soon as you put paint to canvas. The blotted oil will be very easy to handle and will stick readily to the surface. Apply the paint in heavy strokes and do not go over it again (the exceptions to this are glazes after drying or to add highlights). Build up your canvas in this way. 1, I wanted a smooth effect so I added three layers of acrylic (mainly white with a little cadmium yellow and a tiny amount of burnt umber) to the canvas before painting. At every stage I worked slowly with very deliberate strokes, varying the width and length. I worked entirely with one inch and half inch flat brushes.

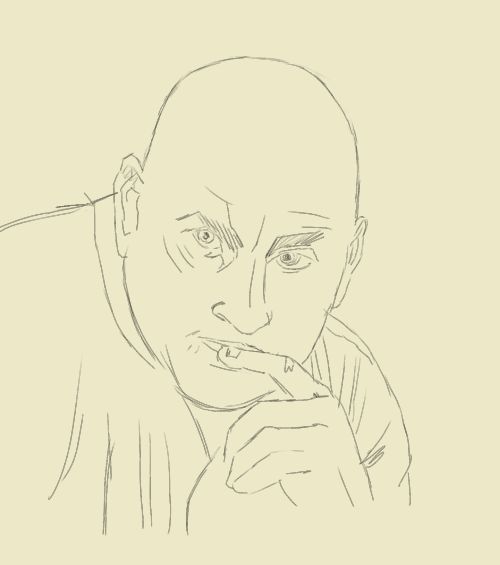
2, I drew the basic face freehand with a HB pencil using my preparatory drawings as a guide. You can do this or use tracing paper if you wish.
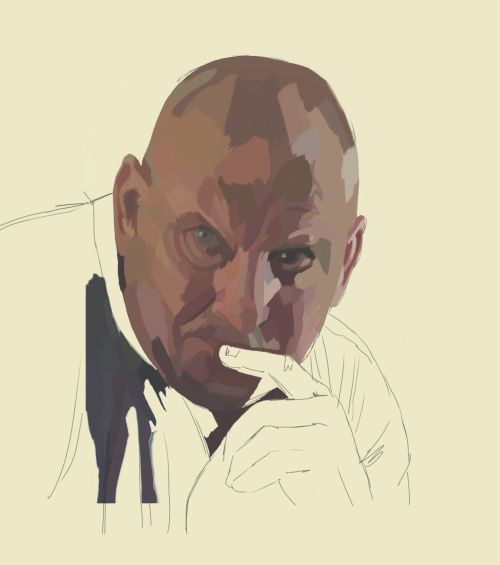
3, Starting with the eyes (which are the most important facial characteristics if your goal is a recognizable likeness) I lay in a mix of cobalt blue, black and burnt sienna. I use cobalt blue with ivory black on the darkest part of the shirt.

4, I add dark browns, three tones of reddish browns and a mid grey and an almost pink for the lighter parts of the face with a 1 inch flat brush. It's important to follow the contours of the face but don't worry about photographic accuracy. Impasto is not the method to use in such a painting.
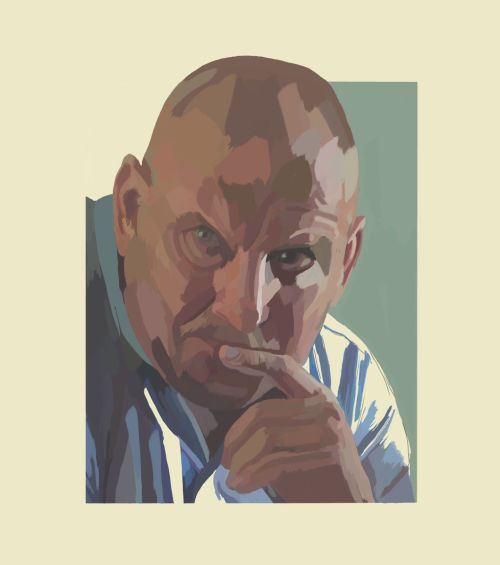
5, At this stage I felt the painting looked as if it would be all reds and browns giving a dull effect. My subject was a large man with a forceful personality so the last thing I wanted to do was dull him down. I decided to darken one side of the painting with a neutral green because greens are natural complimentary colours of reds. Also that I would paint out some of the background making the subject's head burst from the frame, giving the image a graphic feel. Many artists will tut and disaprove of this invasion from a different branch of Art and Design. Don't listen! What works, works! The final effect is all that matters. If you paint for yourself do what pleases you. If you are painting for someone else then, and only then, do you dance to their tune. My client wanted a traditional oil painting but when he saw my take on it, he loved it. His wife loved it more and said I had captured his intensity and physical prescence. If he had disliked it I would have simply repainted the backgound. Once you are established with your own style and your reputation grows you will find patrons quite prepared to put themselves in your hands. I worked on the hand in the same bold style and colour scheme then moved onto the next darkest areas of his clothing. Liking the look of the green area I made the decision to paint out most of the background, framing the subject nicely. In any Oil Painting always add highlights at the very end because as you paint you'll get accidental effects that may encourage you to alter your original colour scheme. You can never tell how light you want to make highlights until the end. I add highlights with a lighter shade of the grey already used.
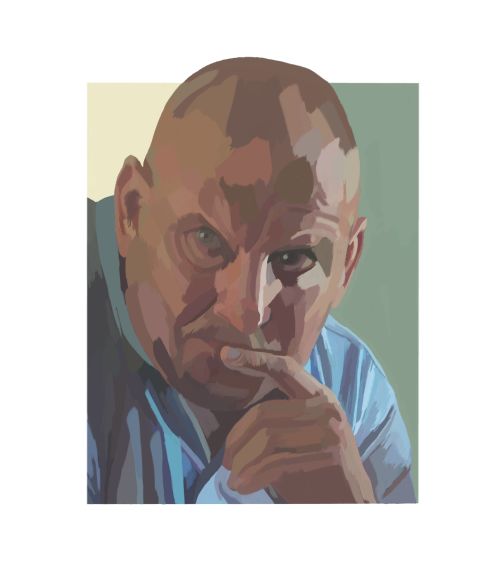
6, I finished the portrait by adding lighter blues to the clothing then I painted out a large part of the background leaving what appears as a frame within a frame. The painting is hung without an actual frame and the stark white makes the image stand out strongly. I spent many hours preparing for this painting but the actual illustrated stages were completed in one hour and fifty minutes. Lightning fast by oil painting standards especially for a slow worker like me. If you want the versatility of oil paint but want to speed things up then impasto is for you
Home Back to Oil Painting Techniques
|

